Pages

Monday, November 19, 2012

DIY Deer Painting (Instead of Deer Hunting)

While my handsome boyfriend may like to deer hunt in the fall, it isn't exactly my cup of tea (all I envision is poor Bambi being shot down...and I prefer not to visualize that!). Instead I opted to paint one for the house.

After hearing a few grumblings from handsome boyfriend that the room upstairs (the one that he gets ready for work in everyday) was a bit too "girly" for his liking, I decided that a little deer art may be right up his alley. I mean, really, deer and antlers and faux animal heads are all the rage now,  aren't they?! How could I go wrong?

I found my inspiration on Pinterest (surprise, surprise). You may find the link to the original blog post handy - DIY Deer Head Silhouette: Wall Art Decor {How to Re-purpose Old Canvas}.

I happened to have a large piece of canvas art in the basement storage closet that was collecting dust, so I opted to re-purpose it into my own, home-made painting.The art I had was similar to the piece (left) and just didn't fit my taste or our house decor anymore.  
<<------------------------------------------

After purchasing a $2 piece of unbleached muslin fabric at Jo-Ann fabric, I used my handy staple gun to affix the fabric over the pre-existing painted canvas artwork (make sure you don't pull the fabric too taut or you may see puckering in your fabric).

I didn't use the projector trick to get the deer on to the canvas like the author of the blog did, but I opted to take my own path.

Instead I found a deer silhouette image online that was free for download.

I then used a neat (and also free) web site called BlockPosters.com to upload my deer silhouette image and increase the size of it for my canvas (basically it asks you how many pieces of 8 1/2 x 11 paper you want to use to blow up your new, larger image).

From there you able to download your larger image and each section of the image can be printed on your own printer paper. Once you tape each piece of paper together you get one large deer head silhouette! (It is much easier than I just made it sound - try it!).


Once I had my large deer head silhouette all taped together, I cut the excess paper off around the deer head so that I could pencil / stencil it onto my muslin fabric. I did a bit of free hand because I wanted my deer slightly larger than what I had printed, but it all turned out fine.

Then came the paint. I carefully hand painted the inside of my deer silhouette (white paint), let that dry, and then tackled the outside of the silhouette (brown paint - which I knew would easily cover up any white paint errors). This was a bit time consuming, but it was also kind of relaxing to do.

In the end, my deer came out without a few minor flaws, but it was a vast improvement from the non-matching, unused canvas that was taking up space in our basement. Handsome boyfriend was pleasantly surprised and complimentary of the new artwork and although the room is still generally "girly", the deer head art provides a little bit of a masculine touch to the upstairs guest bedroom.
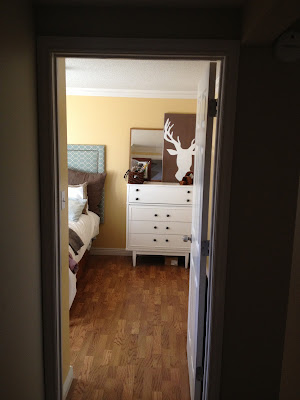


Now I just need to decorate / stage the rest of the dresser top, but for now the deer painting is on display!
Monday, November 12, 2012

DIY Wall Art: From Classy to Sassy

If you have read my past post about my Victory Memorial Garage Sale Finds, you may remember the cheap, but fairly large piece of wall art that I purchased for $3 (which went to charity - how great!). If you don't recall...let me refresh your memory on this classy little piece (that is so.not.my.style). 

Isn't she a beauty?

What drew me to this $3 frame was certainly not the print, but the texture of the frame. Again, I thought that with a little hard work it could be repurposed into something more my style. And if I failed...well, $3 down the toilet isn't too harsh.

I opted to make this piece of art part of a frame collage using existing frames I already owned.


I started the project by peeling the paper off of the back of the frame to reveal the existing matting and art print. I removed both the matting and print, as well as the glass so that only the gold frame remained. ------------------------>

Like past projects, I resorted to spray paint ($4) in glossy black and after three coats and an intermittent hour or two of time, my gold frame was now a lovely bright black!

Unfortunately my lovely black frame and coordinating collage sat empty for a month while I pondered what to fill it with.

In the end I stumbled across a piece of art called "Shattered Earth" from World Market for some inspiration (I loved the colors), as well as a DIY piece of art I saw on Pinterest from BHG (but that looked too time consuming with its metal wire and fabric / yarn weaving).


I opted instead to march over to my local Michael's and locate some beautiful yarn, full of rich jewel tones, and I made the purchase ($5). While there, I grabbed some new 16x20 matting ($5 with coupon) and headed home.

To make the yarn art, I simply used the existing cardboard backing of the original art and cut strips of yard wide enough to wrap around the sides of the cardboard. With clear masking tape, I taped strips of my cut yarn around the front, taping on both side of the back to hold the yarn in place on the cardboard.

Once my yard covered the cardboard (leaving some space at the top and bottom where I knew the matting would cover), I placed the matting and art back into my shiny black frame and ta-daa!!

Total cost = $17 for frame and all re-vamp supplies.
End result = Goodbye classy. Hello sassy, new, one-of-a-kind wall art (that.is.so.much.more.my.style)!


What do you think? Hopefully it's an improvement. Now I just need to find a cuter pillow for the top of my bench...


Friday, November 2, 2012

Festive Fall Front Door Wreath

This blog post will be a quick one, but before fall completely escapes us for winter (I am SO not ready for that yet!) I will share a recent fall wreath that I crafted for our front door.

I found two twig wreaths (in different sizes) at our local dollar store, so the "base" of this wreath cost a mere $2.

At my local JoAnn fabric store I located some cheap fall berry branches (also $1 each), as well as some fabric scraps I had lying around the house in some fall-esque colors.

Using my handy hot glue gun, not only did I successfully burn and blister my fingers a few times, but I rolled and glued long pieces of the fabric into little "flowers" for the wreath. Once ready, I strategically placed the branches and faux flowers on the large wreath and glued in place.

Using some heavy-duty fishing line we so happened to have at home (even though we really don't fish), I laced the two wreaths together and hung on our front door.


I managed to slap together this wreath together in 1-1.5 hours for less than $10. It definitely helps provide a bit of festive fall pizzazz to our front door! Maybe it will ward off winter a bit longer too...