Pages

Showing posts with label DIY. Show all posts
Tuesday, January 8, 2013

Merry Christmas (a bit belated)!

It has been a busy holiday season followed by a nearly two weeks of combined sick time in our household, but I am finally getting around to another blog post! It will be a quick one - flashing back to a few of the cheap / free holiday decor items that I put up around our house this year. These pictures certainly are not all-encompassing, but they are a few of the things I actually remembered to take pictures of!


  • Mason jars (actually cleaned out spaghetti sauce containers) filled with pinecones (collected at the park down the road), topped with a silver glittery ornament and tied with white, rustic ribbons.


  • Pre-owned candle holders filled with free pinecones and pine sprigs (again, both collected from down the street), topped with ivory tea-light candles and tied with rustic twine ribbon.
  • Inside our unused fireplace - a faux, mini Christmas tree topped with ornaments; an old red frame filled with a free Christmas printable (hard to see, but it says "Keep Calm and Let It Snow"); and pinecone-filled mason jars. All decor is sitting on top of an old dresser drawer that I painted cream in color and turned upside-down.

I hope the holiday season was wonderful for you and yours and 2013 brings many fun times and great memories your way! And here's to more fun crafts, decorating and blog posts in the year to come!!
Monday, November 19, 2012

DIY Deer Painting (Instead of Deer Hunting)

While my handsome boyfriend may like to deer hunt in the fall, it isn't exactly my cup of tea (all I envision is poor Bambi being shot down...and I prefer not to visualize that!). Instead I opted to paint one for the house.

After hearing a few grumblings from handsome boyfriend that the room upstairs (the one that he gets ready for work in everyday) was a bit too "girly" for his liking, I decided that a little deer art may be right up his alley. I mean, really, deer and antlers and faux animal heads are all the rage now,  aren't they?! How could I go wrong?

I found my inspiration on Pinterest (surprise, surprise). You may find the link to the original blog post handy - DIY Deer Head Silhouette: Wall Art Decor {How to Re-purpose Old Canvas}.

I happened to have a large piece of canvas art in the basement storage closet that was collecting dust, so I opted to re-purpose it into my own, home-made painting.The art I had was similar to the piece (left) and just didn't fit my taste or our house decor anymore.  
<<------------------------------------------

After purchasing a $2 piece of unbleached muslin fabric at Jo-Ann fabric, I used my handy staple gun to affix the fabric over the pre-existing painted canvas artwork (make sure you don't pull the fabric too taut or you may see puckering in your fabric).

I didn't use the projector trick to get the deer on to the canvas like the author of the blog did, but I opted to take my own path.

Instead I found a deer silhouette image online that was free for download.

I then used a neat (and also free) web site called BlockPosters.com to upload my deer silhouette image and increase the size of it for my canvas (basically it asks you how many pieces of 8 1/2 x 11 paper you want to use to blow up your new, larger image).

From there you able to download your larger image and each section of the image can be printed on your own printer paper. Once you tape each piece of paper together you get one large deer head silhouette! (It is much easier than I just made it sound - try it!).


Once I had my large deer head silhouette all taped together, I cut the excess paper off around the deer head so that I could pencil / stencil it onto my muslin fabric. I did a bit of free hand because I wanted my deer slightly larger than what I had printed, but it all turned out fine.

Then came the paint. I carefully hand painted the inside of my deer silhouette (white paint), let that dry, and then tackled the outside of the silhouette (brown paint - which I knew would easily cover up any white paint errors). This was a bit time consuming, but it was also kind of relaxing to do.

In the end, my deer came out without a few minor flaws, but it was a vast improvement from the non-matching, unused canvas that was taking up space in our basement. Handsome boyfriend was pleasantly surprised and complimentary of the new artwork and although the room is still generally "girly", the deer head art provides a little bit of a masculine touch to the upstairs guest bedroom.
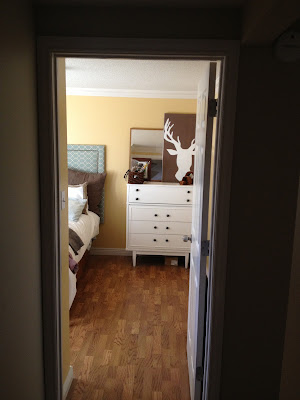


Now I just need to decorate / stage the rest of the dresser top, but for now the deer painting is on display!
Monday, November 12, 2012

DIY Wall Art: From Classy to Sassy

If you have read my past post about my Victory Memorial Garage Sale Finds, you may remember the cheap, but fairly large piece of wall art that I purchased for $3 (which went to charity - how great!). If you don't recall...let me refresh your memory on this classy little piece (that is so.not.my.style). 

Isn't she a beauty?

What drew me to this $3 frame was certainly not the print, but the texture of the frame. Again, I thought that with a little hard work it could be repurposed into something more my style. And if I failed...well, $3 down the toilet isn't too harsh.

I opted to make this piece of art part of a frame collage using existing frames I already owned.


I started the project by peeling the paper off of the back of the frame to reveal the existing matting and art print. I removed both the matting and print, as well as the glass so that only the gold frame remained. ------------------------>

Like past projects, I resorted to spray paint ($4) in glossy black and after three coats and an intermittent hour or two of time, my gold frame was now a lovely bright black!

Unfortunately my lovely black frame and coordinating collage sat empty for a month while I pondered what to fill it with.

In the end I stumbled across a piece of art called "Shattered Earth" from World Market for some inspiration (I loved the colors), as well as a DIY piece of art I saw on Pinterest from BHG (but that looked too time consuming with its metal wire and fabric / yarn weaving).


I opted instead to march over to my local Michael's and locate some beautiful yarn, full of rich jewel tones, and I made the purchase ($5). While there, I grabbed some new 16x20 matting ($5 with coupon) and headed home.

To make the yarn art, I simply used the existing cardboard backing of the original art and cut strips of yard wide enough to wrap around the sides of the cardboard. With clear masking tape, I taped strips of my cut yarn around the front, taping on both side of the back to hold the yarn in place on the cardboard.

Once my yard covered the cardboard (leaving some space at the top and bottom where I knew the matting would cover), I placed the matting and art back into my shiny black frame and ta-daa!!

Total cost = $17 for frame and all re-vamp supplies.
End result = Goodbye classy. Hello sassy, new, one-of-a-kind wall art (that.is.so.much.more.my.style)!


What do you think? Hopefully it's an improvement. Now I just need to find a cuter pillow for the top of my bench...


Friday, November 2, 2012

Festive Fall Front Door Wreath

This blog post will be a quick one, but before fall completely escapes us for winter (I am SO not ready for that yet!) I will share a recent fall wreath that I crafted for our front door.

I found two twig wreaths (in different sizes) at our local dollar store, so the "base" of this wreath cost a mere $2.

At my local JoAnn fabric store I located some cheap fall berry branches (also $1 each), as well as some fabric scraps I had lying around the house in some fall-esque colors.

Using my handy hot glue gun, not only did I successfully burn and blister my fingers a few times, but I rolled and glued long pieces of the fabric into little "flowers" for the wreath. Once ready, I strategically placed the branches and faux flowers on the large wreath and glued in place.

Using some heavy-duty fishing line we so happened to have at home (even though we really don't fish), I laced the two wreaths together and hung on our front door.


I managed to slap together this wreath together in 1-1.5 hours for less than $10. It definitely helps provide a bit of festive fall pizzazz to our front door! Maybe it will ward off winter a bit longer too...


Sunday, October 28, 2012

DIY Headboard with Nailhead Trim

When we moved into our first home together, we quickly realized that along with more space came the need for more furniture to fill it! While we first splurged on a king bed for the master (best money ever spent - trust me!) we both also brought along our previous queen beds from our individual apartment/bachelor pad dwelling days of life for our guest bedrooms.

Unfortunately neither bed had a headboard (which meant something left to be desired from a home decor standpoint), but after spending money on our king bed, new leather sectional, new coffee tables, etc. we did not have a ton of extra cash lying around for something pretty like a headboard that is not exactly "essential" to have. BUT when I get an idea in my head to do something, typically that idea will not be dropped easily (yes, I have a stubborn streak). Enter the homemade headboard for an affordable price.

Due to my obsession with getting a headboard for a least one room, I found some cute DIY upholstered headboards on Pinterest and some random blogs and I knew I could make one for a fraction of the cost of buying one from a store.

Materials needed for DIY Upholstered Headboard w/ Nailhead Trim
  • Plywood slab (1/2" to 5/8" thickness, cut to your desired height and width)
  • Quilt batting (enough to meet your desired headboard plushness). 
    • *Note: For those who want a really plush headboard you can also use foam / eggshell bed mats, cut and trimmed down to desired size. This adds to the cost and complexity of project and in my mind is not necessary unless you plan to read against your headboard every night for hours on end)
  • Spray adhesive
  • Staple gun (with staples that are not too long - you don't want them going through your plywood!)
  • Rubber mallet
  • Upholstery fabric of your choosing
  • French cleats (to hold up to 200lbs)  to hang headboard
  • Nailhead trim of desired metal color 
    • *Note: You may be able to find a couple of kinds of nailhead trim at JoAnn fabric, but I purchased mine online as there were more color options. Opt for 10 yards of nailhead trim that only requires you to nail every 5th nail as this means a much straighter line and easier installation)
I sent my lovely boyfriend - who so kindly puts up with my stubbornness and random house projects - off to Home Depot on my behalf to get a slab of 5/8" inch plywood for the headboard (they were out of it that day, so they gave him 1/2" inch plywood for a super discounted price for the inconvenience). The kind folks at HD will cut down the wood for free to your desired height and width. I measured the width of the queen bed and added a couple inches on either side and simply guestimated on the height.

I went to JoAnn Fabric and Michaels to purchase the spray adhesive and quilt batting (definitely use their regular 40% off one item for quit batting which can get expensive).

I found some fabric that I liked at JoAnn's and they happened to be having a huge upholstery sale. I opted for the Waverly Sun N Shade Outdoor Fabric in Chippendale Fretwork Mineral. I got three yards for only $7.99 a yard (normally $24.99) and I was on my way.

Once I had all of my materials I started to build the headboard.
  • Lay plywood down on the ground 
  • Spray wood with thin layer of spray adhesive
  • Layer quilt batting over entire piece of plywood (using spray adhesive between layers) to preferred thickness. 
  • Carefully align fabric over the wood and batting, ensuring pattern is straight
  • With help from someone, tilt plywood up off of the ground and carefully begin stapling fabric around the back side of the plywood. (Staple fabric 2-3" inches from top, bottom, and sides and ensure that the fabric pattern is properly aligned as you go along. Also make sure fabric is pulled taught, but not too tight to avoid fabric puckering). 
  • Once plywood and batting are wrapped with fabric and secured with staples, add your nailhead trim using the rubber mallet! (Read directions on box and place nailhead trim at desired location on headboard. You won't necessarily need to do the bottom of headboard as it will likely be covered by the bed. It can be hard to keep the trim straight - as you will see by my slight flub on the top of my headboard - so go slowly!)
  • Enjoy your final product, and if preferred, hang with french cleats on the wall behind your bed!
My final headboard cost around $100 and it definitely adds some pizzazz to at least one of our guest bedrooms!


Monday, October 1, 2012

Baby, oh baby!

While digging through some photos from 2011 and 2012, I realized I have done a few "other" projects (mostly Pinterest-related ) that are blog-worthy. 

Last winter I helped throw a baby shower for one of my good friends and as part of my decorating duties I created a couple of fun decor items.

1) A baby clothes clothesline (complete with rustic brown twine and clothespins which hold the onesies, bibs, and baby socks that can be used upon baby's arrival).


2) A diaper baby cake (made of diapers and other usable goods for the mama and papa to-be)

I must say I am still fairly proud of my first diaper cake. While I learned about how to craft a diaper cake online, I selected the receiving blankets (wrapped and pinned around the layers of diapers), dual polka dotted ribbons, pacifiers, cake "toppers", and custom painted initial letter all on my own (it was a plain wood letter "R" and I painted it white and used a pencil eraser to do the painted black dots - and yes, I wanted it to match the ribbons...slightly compulsive, I know). There was some personal flavor put into this one.

I love how it turned out and my uber-preggo friend was thrilled with it as well! It coordinated with the "winter white" theme of the shower, was very gender neutral, and fairly modern as well (if I do say so myself)! All of the various decor pieces also made some nice gifts for the proud parents. Dual purpose = great!


Saturday, September 29, 2012

Take A Seat: Piano Bench Makeover

One of the finds at the Victory Memorial Garage Sale in June was a cute little piano bench that I acquired for a mere $10. Yes, the wood was quite light and not my style...and yes, the upholstered seat was a worn cream-colored fabric...but the lines were clean and I.knew.I.had.to.have.it.
With a little bit of of effort, I was able to revamp the piano bench into a nice bench for our entryway.

I began the process by removing the upholstered top (it is literally attached by four screws, so all it took was a simple screwdriver to unattach the seat.

I then took some 100lb sand paper and put some elbow grease into smoothing out some nicks and dents, as well as removing the wood finish. After sanding to my liking, I did a spray down with the hose to remove the dust, and then wiped down with a towel. After drying outside for 10 minutes it was ready for some spray paint!

Using some black, semi-gloss Rustoleum spray paint (two bottles at about $5 a piece), I layered the wood bench with a few coats of spray paint, letting each coat dry before reapplying the next.
After about two months of searching for some new home decor fabric (yes, you could say I am a nit indecisive and paranoid I will make the wrong home decor choice - gasp!) I found a fabric I liked. I settled on a printed home decor fabric at Jo Ann Fabric called "Croscill Felton / Chili" (left). At $29.00 a yard, I was lucky to get it at 50% (and I got some extra in case I opt to make a pillow or two for the couch when I FINALLY learn to sew).

With the wood portion of the bench painted, I whipped out my handy staple gun and laid the fabric down, cut it so a few inches remained on all sides of the seat, and then carefully stapled over the old fabric around the entire seat (making sure the pattern was always aligned).
Once the seat was reupholstered (took about 15 minutes), I reattached the seat to the wood frame and WOW....a totally new bench! It looks nice in our entry, and now I just need to get the wall above it complete!


Now if only I could get my picture collage completed I would have a vastly improved front door space! Future blog post on that down the road...